Search This Blog

Monday, September 11, 2017

Dessert: Easy Peach Cobbler

This recipe was found in the July 2017 issue of Southern Living.  It is excellent.  Once you have sliced the peaches, all the hard work is done.  It really lives up to its name.

Ingredients:

1 3/4 lb. fresh peaches (about four peaches will do)
1/2 cup butter (original recipe called for salted butter, but I used unsalted and it was fine)
1 cup self-rising flour (if you only have all-purpose flour, add 1/3 tsp. salt and 1/3 tsp. baking powder)
1 cup granulated sugar
1 cup whole milk
1 tsp. vanilla

Directions:
1.  Preheat oven to 350 degrees Fahrenheit.  Gently rub the peaches under running water to remove fuzz, and slice peaches.  (You will have about 4 cups of peaches.)

2. Place butter in an 11x7-inch baking dish; place dish in oven until butter melts.

3.  Stir together flour, sugar, milk, and vanilla in a bowl and pour onto melted butter. (Do not stir.)

4.  Spoon sliced peaches over the flour mixture in the baking dish. (Do not stir.)

5.  Bake in preheated oven until brown and bubbly.  (About 45-50 minutes)


Easy Peach Cobbler
Photo: Iain Bagwell; Prop Styling: Mindi Shapiro Levine; Food Styling: Torie Cox

Monday, May 16, 2016

Side: Crunchy Broccoli Toss

I've been in a "side dish" rut.  You can only serve steamed broccoli so many times before the family starts to get wise to your lack of innovation.  So, I've been searching for inspiration for side dishes.

Thanks to "Parents" magazine, I came across this winner a few weeks ago.  I love that you can prepare it, pop it in the refrigerator, and just pull it out when you are ready for it.  That makes it perfect social gatherings at my house in which MEAT is the main event.  When that meat gets pulled off the grill, everything else needs to be ready to go!  This side is ready when you need it.

Here's what you need:
4 cups of small broccoli florets
1 15.5 ounce can of no-salt-added Great Northern Beans, rinsed and drained
1 8 ounce package of frozen, shelled edamame (sometimes packaged as "Mukimame"), thawed
2 limes, juiced (1/4 cup)
2 Tbsp. canola oil
2 tsp. sesame oil*
4 tsp. reduced sodium soy sauce
1/4 tsp. of each, salt and freshly ground pepper

* We've discovered from previous food preparation that sesame oil upsets my husband's stomach.  Therefore, I just replaced the sesame oil with canola oil.  It turned out fine!

Make sure to pick up soft limes for maximum juice.  I don't think you can go wrong with a little extra lime juice in this recipe, so I used three limes.  Next time, I'm going to try grating a little lime zest into the vinaigrette.

I found a pre-packaged container of broccoli florets in my grocer's produce section.  I did not do a scientific comparative analysis, but I figured that the higher cost per pound of the pre-packaged florets was offset by the amount of a broccoli head that you are throwing away in order to get just the florets.  For instance, if the pre-packaged florets cost twice as much per pound as the pound of a head of broccoli, then it's about the same cost because you are only taking the tops of the broccoli head, but paying for the discarded trunk.  Maybe I'll do an experiment on it at a later date.

Directions:
1. In a large serving bowl, combine the broccoli, beans, and edamame.
2. In a small bowl, whisk together the lime juice, canola oil, sesame oil, soy sauce, salt, and pepper. 
3. Toss the prepared vinaigrette on the broccoli mixture.
4. Let stand for at least 30 minutes at room temperature, or up to one day, covered, in the refrigerator.

Makes 4 servings.

Nutrition Information:
283 calories
13 g protein
14 g fat (2 g saturated fat)
29 g carbohydrates (10 g fiber; 5 g sugar)
3 mg iron
172 mg calcium
399 mg sodium

Recipe adapted from "Parents" magazine, May 2016

Tuesday, May 26, 2015

Sauce: Salsa Verde

This recipe comes from Bon Appetit's "Slow-Grilled Leg of Lamb with Mint Yogurt and Salsa Verde."

Photograph by Marcus Nilsson

This tangy sauce was made as an accompaniment to Tri Tip cooked on a smoker.  We really enjoyed it!  It was the closest we've gotten to making a chimichurri sauce comparable to what we've had in restaurants.  Following the Bon Appetit recipe, we decided we wanted to change a couple of things.  First, the sauce was really oily.  When you spooned it on to the plate, the green solids sat in a pool surrounded by yellow oil.  In the picture above, it looks like it should be more of a paste.  In addition, our herbs were completely pulverized by our Magic Bullet, so we need to just add those at the end and pulse it a little. Finally, the sauce seemed to be missing a little zing, so we added some trusty sriracha sauce. 

I've tweaked the original recipe to incorporate the changes we would like to make to the sauce.

Ingredients
6 oil-packed anchovy fillets (pat dry with paper towel to absorb oil)
4 chopped garlic cloves
1/2 cup extra virgin olive oil
2 Tablespoons drained capers
1 Tablespoon lemon juice
A squirt of sriracha sauce

3/4 cup chopped parsley
1/2 cup chopped mint

Directions
Add the first six ingredients to a food processor and process until anchovies and garlic are blended.  Then add the herbs and pulse to combine.  (When in doubt about the amount of herbs, put in more!)
Season with salt and pepper to taste.


Sunday, October 19, 2014

Fast and Tangy Beef Stew in a Pressure Cooker

It was a lazy Saturday afternoon.  My husband was channel surfing when he got sucked into an infomercial about a pressure cooker.  It wasn't long before I was sucked in, too.  Absolutely, of course we needed this tool in our kitchen!  We could make chicken wings!  Lobsters!  and so much more!!

About a week later, the miraculous machine appeared on our doorstep.  Great.  Now I have to figure out how to use it.

We decided to break it in with a hearty Beef Stew.  So, I had to consult Google for a pressure cooker recipe of this dish.  I finally settled on a recipe from the site, Never Enough Thyme.  The newfangled pressure cooker simplifies the process.  The recipe's author talks about how to use a conventional pressure cooker to create this dish.  I must admit, I was a bit terrified after reading her telling of her own mother's pressure cooker exploding all over her childhood kitchen!  I was so thankful for the new innovations that allow me to cook quickly without worrying about nuclear situation in my own kitchen.  I can barely handle the mess created by my two boys.  Geez, now I am sounding like a testimonial for this pressure cooker...

Ingredients:
1 1/2 lbs. beef stew meat
3 tblsp. oil
2 large potatoes, peeled and cut into bite-sized cubes
4-5 large carrots, peeled and cut into bite-sized pieces
1 large onion, peeled and cut into chunks
1 can (14.5 oz) green beans with liquid
2 cans (14.5 oz. each) diced tomatoes with liquid
Salt
Pepper
2 tblsp. cornstarch
1/3 cup cold water

Directions:
1.  If the stew meat is not already in bite-sized pieces, then cut the meat.
2.  Heat the pressure cooker over medium high heat. Add the oil and stew meat. Stir and cook until the meat is well browned all over.  (*My PC has a saute function that allows me to push a button to heat the inner pot)
3.  Add the potatoes, carrots, onion, and beans with their liquid.
4.  Add the tomatoes with their liquid.
5.  Add salt and pepper to taste.  (I probably added 2 teaspoons of each)
6.  Close the lid and place the weight (regulator) on the pressure cooker according to your manufacturer’s instructions. Heat on medium high setting until pressure is achieved (weight begins to rock back and forth). Continue cooking for 15 minutes. Keep the heat regulated so that the weight rocks gently and steadily throughout cooking.  (On my PC, I locked the lid on the unit, slid the button on top to "Close."  Then, I pushed the "Stew" button and set the timer to 15 minutes).
7.  At the end of the 15 minutes cooking time, reduce the pressure immediately by running cold water on the top of the pressure cooker. Do not remove the weight until the cooker has completely vented. When the pressure releases, open the cooker and place it back on the stove.  (I was able to push the "Release" button to quickly release the pressure.  No picking it up!)
8.   Combine the cornstarch and cold water in a small bowl. Bring the stew back up to the boil, add the cornstarch and water and stir until thickened.  (I just left the stew in the inner pot where it was being kept warm.  I added the cornstarch mixture and it thickened the stew nicely.)

This recipes yields 6-8 servings.  Serve with some crusty warm bread.  If you're lucky like me, your fantastic spouse will make some delicious garlic bread to go with the stew!
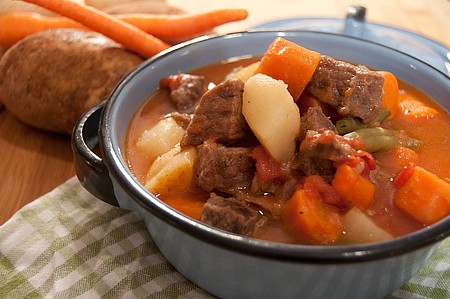
Beef Stew
Picture credit:  Lana Stuart of Never Enough Thyme

If you are dubious like I was about tomatoes in a beef stew, don't be!  I was so pleasantly surprised.  The tomatoes add a tang and acidity that transform this dish from a bland, perfunctory dish to a bright, elegant entree.  In addition, I was so pleased at how tender the beef was in this stew.  I have made beef stew many times in a stovetop crock or in a slow cooker.  Never has the meat been that tender.

The verdict was out on this pressure cooker before I made this meal.  Now, it's clearly a keeper.  My next task... finding a place to put it!


Sunday, July 13, 2014

Smoky Slow-Grilled Chicken with Alabama White Barbecue Sauce (serves 4-6 with leftover sauce)

This recipe is taken from Men's Journal magazine, July 2014

My husband found this recipe in one of his magazines.  He took the lead on the preparation and what followed was a masterpiece.  I will have to take pictures the next time we prepare it.

When he said it was "white barbecue sauce", I rolled my eyes.  I thought, "Well, that's not going to be any good."  I am happy to report that I was very wrong.  The brine of this recipe creates a very juicy, tender chicken.  The sauce gives it a lively tang.

Ingredients:
1 4-5 pound chicken

For the brine:
1 gallon of water
3/4 cup kosher salt
3/4 cup sugar
2 tbsp black pepper
1/2 white onion, sliced
2 garlic cloves, smashed

For the sauce:
2 cups mayonnaise
1 1/4 cup cider vinegar
1/2 tbsp Worcestershire sauce
1 tbsp black pepper
3/4 tsp cayenne pepper
1 tbsp kosher salt
1/2 tsp minced garlic
1 1/2 tbsp cane syrup or honey

Combine the brine ingredients and brine chicken in the refrigerator for 4-8 hours.  While chicken is brining, make the sauce.
Mix together mayonnaise and vinegar, followed by the remaining ingredients.  Stir together to incorporate.  The end product will look like a runny Ranch dressing.

Start your fire, and let it burn down to a medium-hot gray ash (or turn your gas grill to medium). 
Drain and pat the chicken very dry, then use shears to cut out the backbone and open the bird flat.


Photo credit:  seriouseats.com


Season with olive oil, salt, and pepper.

Hold your hand 2 inches above the grill grates.  When you can keep it there for 3 seconds, lay the chicken down, skin side up.  Put a heavy skillet on top of the chicken and place a brick, or similarly heavy, heat-resistant object, in the skillet to weigh it down.

Cook chicken for 12-15 minutes, then flip and cook for another 12-15 minutes, or until it's just done.  Remove and immediately glaze with sauce.  Let the meat rest on a cutting board for 2-3 minutes before serving with more sauce.
Grill It Low and Slow: Pat Martin, Martin's Bar-B-Que Joint
Credit: Photograph by Christopher Testani

Monday, April 21, 2014

Roasted Leg of Lamb

I cook Lamb so infrequently that I'm always forgetting how I cooked it the last time.  I cooked it last night and it turned out lovely.  So, I'm going to record how I did it lest I forget again!

4 lb. leg of lamb
lemon juice
2 t. thyme
2 t. pepper
1/4 C. rosemary
olive oil
3 cloves of garlic, cut into slivers
Oven bag

Preheat oven to 450 degrees F.
Let the meat sit out for 30 minutes or so to bring the temperature up.

1.  Punch holes all over the meat with a sharp knife.
2.  Spread lemon juice all over the meat with hands making sure to work it into the holes.
3.  Put the slivers of garlic into the holes made in step 1.
4.  Combine the thyme, pepper, and rosemary in a dish. 
5.  Spread the herb mixture from step 4 all over the meat including the interior.
6.  Drizzle the olive oil all over the leg of lamb enough to just coat it using your hands.
7.  Place the lamb in the oven bag, then seal the bag with the provided zip tie.
8.  Place the bag on the rack in the roasting pan.
9.  Cut a few vent holes in the oven bag for the steam to escape.
10. Place the roasting pan in the oven.  Watch that the oven bag is not touching the top or sides of the oven.
11.  Roast the meat at 450 F for 15 minutes.
12.  Turn the temperature down to 325 F and cook for 60 minutes. (internal temperature should reach 140 F)
13.  Take the meat out and let it rest for 15 minutes. 

Next time I do this, I would like to put a couple of sprigs of fresh rosemary in the bag with the lamb while it's cooking. 

Wednesday, February 5, 2014

Creamy White Chicken Alfredo Lasagna


I'd like to try this recipe...
 
Ingredients:
2 cups shredded cooked chicken breasts
1 can (14 oz.) artichoke hearts, drained, chopped
1 pkg. (8 oz.) KRAFT Shredded Mozzarella Cheese with a TOUCH OF PHILADELPHIA, divided
1/2 cup KRAFT Grated Parmesan Cheese
1/2 cup chopped drained oil-packed sun-dried tomatoes
2 pkg. (8 oz. each) PHILADELPHIA Cream Cheese, softened
1 cup milk
1/2 tsp. garlic powder
1/4 cup tightly packed fresh basil, chopped, divided
12 lasagna noodles, cooked

Instructions:
HEAT oven to 350°F.
COMBINE chicken, artichokes, 1 cup mozzarella, Parmesan and tomatoes. Beat cream cheese, milk and garlic powder with mixer until well blended; stir in 2 Tbsp. basil. Mix half with the chicken mixture.
SPREAD half the remaining cream cheese mixture onto bottom of 13x9-inch baking dish; cover with 3 noodles and 1/3 of the chicken mixture. Repeat layers of noodles and chicken mixture twice. Top with remaining noodles, cream cheese mixture and mozzarella; cover.
BAKE 25 min. or until heated through. Sprinkle with remaining basil. Let stand 5 min. before cutting to serve.